First steps in Globula: Difference between revisions
m Article completed |
|||
| (8 intermediate revisions by the same user not shown) | |||
| Line 1: | Line 1: | ||
[[Category:Manuals]] | [[Category:Manuals]] | ||
The basic task is to explore the universe of Globula with the help of different tools: harvest TEUs, acquire components and blueprints to craft all the necessary equipment. | The basic task is to explore the universe of Globula with the help of different tools: harvest TEUs, acquire components and blueprints to craft all the necessary equipment. | ||
| Line 96: | Line 95: | ||
==Remote Storage: Charging Batteries== | ==Remote Storage: Charging Batteries== | ||
Empty batteries can be charged directly via a harvester (one by one) or via the Remote storage menu (several at once), provided the RS contains enough TEUs harvested previously. | |||
The screenshots below show the INV menu – Remote Storage (swipe left or right to see INV menu titles). First, the empty or partially discharged battery must be removed into the inventory (long tap the lower slot). Then tap any empty slot of the RS to open the battery window and tap the battery to place it into the chosen slot. | |||
<gallery widths="250px" heights="250px" perrow="3"> | <gallery widths="250px" heights="250px" perrow="3"> | ||
File:First Steps 14.jpg| | File:First Steps 14.jpg|Then tap any empty slot of the RS to open the battery window. | ||
File:First Steps 15.jpg| | File:First Steps 15.jpg|Tap the battery to place it into the chosen slot. | ||
File:First Steps 16.jpg| | File:First Steps 16.jpg|The battery starts charging the moment it’s placed into the RS slot, provided the app is open. | ||
</gallery> | </gallery> | ||
The RS does not charge batteries if the app is closed or in the background mode. | |||
==Crafting== | ==Crafting== | ||
<gallery widths="250px" heights="250px" perrow=" | Components received from globulas are used in crafting the equipment. | ||
File:First Steps 17.jpg| | |||
File:First Steps 18.jpg| | <gallery widths="250px" heights="250px" perrow="2"> | ||
File:First Steps 17.jpg|Tap the INV menu – Blueprints to see blueprints in stock. | |||
File:First Steps 18.jpg|Tap any blueprint to open the CHRONUFUSER window. | |||
</gallery> | </gallery> | ||
At the top right corner of both the Chronofuser and any blueprint there’s Success rate index (shows the chance of successful crafting from 1 to 100%). The lower panel shows all available blueprints in stock. | |||
<gallery widths="250px" heights="250px" perrow="1"> | <gallery widths="250px" heights="250px" perrow="1"> | ||
File:First Steps 20.jpg| | File:First Steps 20.jpg|Tap any to open the pop-up window with its description and the list of the required components. | ||
</gallery> | </gallery> | ||
Red/green numbers on the left show the necessary items while the blue ones on right show the items in stock, including the TEUs. | |||
The PRODUCE button becomes tappable when all the resource requirements are met (in green). | |||
Crafting uses up the blueprint and the resources (those items are removed from the inventory). The log shows the result (either an item is successfully produced, or the process fails). | |||
'''Warning!''' ''Blueprints are consumable items. Both the blueprint and the set of the required components together with TEUs are removed from the inventory whatever the result of the crafting. It is highly recommended to use only high success rate blueprints for crafting to avoid loss of components.'' | |||
==Scanning Globulas and Acquiring Blueprints== | ==Scanning Globulas and Acquiring Blueprints== | ||
Blueprints are obtained with the help of a special tool (requires crafting). At the start of the game a 100% success rate Basic [[Blueprint Basic SO-RI|SO-RI blueprint]] is already placed in your inventory. | |||
Once it’s been crafted in the Chronofuser it becomes available as one of the [[Tools|tools]]. | |||
The SO-RI is placed into the [[Upper Slot|upper slot]], it also requires a charged battery in the [[Lower Slot|lower slot]]. | |||
The radius of the SO-RI is a lot shorter than that of any weapon. Tap the globula once it’s in the scanning light cone, then tap the SO-RI to perform the scanning. | |||
There are three possible outcomes of the scanning:<br> | |||
– it may produce one blueprint layer (the sys log would give the name of the exact blueprint);<br> | |||
– it may fail and generate no layers of blueprints;<br> | |||
– it might become unavailable if the number of scanning attempts exceeds a certain number.<br> | |||
The Basic SO-RI has a very low scan success chance. Besides, each globula can be scanned no more than three times. After the third attempt, the tool would signal that scanning is not available any more for that globula, and another target should be chosen for scanning. | |||
Each successful scanning produces just one layer of a blueprint. The number of layers already collected is shown at the top right corner of a blueprint and corresponds to the success rate for crafting. Each successful scan adds one layer to a blueprint up to 100. The 101st successful scan of a blueprint will add another copy to the inventory, thus creating a 100% blueprint and a 1% blueprint. | |||
==Compass== | ==Compass== | ||
There is a compass scale at the top of the map. | |||
<gallery widths="250px" heights="250px" perrow="1"> | <gallery widths="250px" heights="250px" perrow="1"> | ||
File:First Steps 21.jpg| | File:First Steps 21.jpg|It shows the four cardinal directions (E, N, W, S), and will always point north at the launch of the app. | ||
</gallery> | </gallery> | ||
You can change the view direction by sliding your finger over the map. To define your actual position use map objects such as buildings and roads to correlate with the real world objects around. The compass does not show your actual movement direction. | |||
''The map does not autorotate on the move!'' It will only rotate around a targeted globula while it’s within a weapon/tool’s range to keep it visible if the hunter is moving. | |||
==Chats and logs== | ==Chats and logs== | ||
| Line 128: | Line 168: | ||
File:First Steps 22.jpg| | File:First Steps 22.jpg| | ||
</gallery> | </gallery> | ||
Tap or swipe up the ‘=’ element at the bottom of the screen to pull open the chats and logs window. Swipe the ‘=’ element up or down to change the window size. To close the chat, tap anywhere on the screen outside the window. | |||
The chats and logs window has three tabs: ALL, SOC and SYS. | |||
'''The SYS (system) tab''' contains game logs: TEUs used for weapon discharge, damage dealt and received, items dropped, and so on. | |||
<gallery widths="250px" heights="250px" perrow="1"> | <gallery widths="250px" heights="250px" perrow="1"> | ||
File:First Steps 23.jpg| | File:First Steps 23.jpg|All damage logs can be switched off by tapping the quasar-icon in the right corner of the chat window. | ||
</gallery> | </gallery> | ||
'''The SOC (social) tab''' is for in-game communication. | |||
<gallery widths="250px" heights="250px" perrow="1"> | <gallery widths="250px" heights="250px" perrow="1"> | ||
File:First Steps 24.jpg| | File:First Steps 24.jpg|There is a chat distance filter in the upper part of the tab: 5, 20, 100 and 1000 km radius from your current position. | ||
</gallery> | </gallery> | ||
The chat shows the latest 25 messages. To load the previous messages, pull the chat down. Each swipe down will load another 25 messages. You can scroll the messages by swiping the chat up-down or with a slider on the right. | |||
''All transmitted messages are available in the maximum 1000 km radius whatever the chosen distance of the message filter in the chat options!'' | |||
'''The ALL tab''' contains all messages, including system logs and social interaction. | |||
==Minting and Transferring Items== | ==Minting and Transferring Items== | ||
Almost any item in the game can be minted into an [https://en.wikipedia.org/wiki/Non-fungible_token NFT] and put into your TON wallet to be sold or handed over. And any NFT from GLOBULA blockchain can be transferred back into the game. | |||
Practically any component, resource, weapon, blueprint, tool or battery can be NFT'd or turned back into playable objects, apart from the first items given at the registration as a basic starter kit. | |||
In order to be able to create and transfer NFTs you must have a [[Registration in the Globula app#How to create a TON wallet?|TON wallet]] bound and connected to your account. | |||
Open the required inventory tab and long tap an object you want to NFT. | |||
<gallery widths="250px" heights="250px" perrow="1"> | <gallery widths="250px" heights="250px" perrow="1"> | ||
File:First Steps 25.jpg| | File:First Steps 25.jpg|You will see the following pop-up. | ||
</gallery> | </gallery> | ||
Tap [[Mint]] to open your TON wallet and confirm the minting (costs 0.02 TON). | |||
If you are using the login-password method for the app, you would also need to connect a TON wallet to perform any of the minting operations. Make sure you connect the same TON wallet that has been bound to your account. | |||
The transaction may take up to 5 minutes. Once it's finished, you will see your NFT'd item back in its designated inventory tab but with a special chain icon on the right. The NFT itself will be placed into your TON wallet collection. | |||
<gallery widths="250px" heights="250px" perrow="1"> | <gallery widths="250px" heights="250px" perrow="1"> | ||
File:First Steps 26.jpg| | File:First Steps 26.jpg|the blueprints inventory tab, some items are playable (the number index on the right), some are marked as NFT'd items (the chain icon) in a TON wallet. | ||
</gallery> | </gallery> | ||
''You can create a unified (bulk) NFT containing several identical items at once! For example, you own 1000 components or blueprints of the same item. You can choose any quality of identical items when creating an NFT. Thus, a single NFT can be turned back into multiple playable items.'' | |||
NFTs can't be used directly in the game. These objects are for trading and handing over only, but can be turned back into playable items if required. | |||
<gallery widths="250px" heights="250px" perrow="1"> | <gallery widths="250px" heights="250px" perrow="1"> | ||
File:First Steps 27.jpg| | File:First Steps 27.jpg|To transfer an NFT back into the game as a playable item long tap its icon (with a chain symbol on the right). You will see the following pop up. | ||
</gallery> | </gallery> | ||
Tap Transfer to open your TON wallet and confirm the operation (costs 0.02 TON). | |||
Please wait for the transaction to be fully finished in the blockchain. | |||
The NFT will be removed from your TON wallet and placed into your game inventory as a regular playable item (no chain symbol on the right) for further use. | |||
==User Settings== | ==User Settings== | ||
Tap the Gear icon in the top right corner to open the user settings pop-up menu. | |||
<gallery widths="250px" heights="250px" perrow="2"> | <gallery widths="250px" heights="250px" perrow="2"> | ||
| Line 158: | Line 234: | ||
File:First Steps 29.jpg| | File:First Steps 29.jpg| | ||
</gallery> | </gallery> | ||
It contains:<br> | |||
– background music volume;<br> | |||
– sound effects volume;<br> | |||
– vibration intensity;<br> | |||
– 3D buildings effect on/off;<br> | |||
– connections menu (your TON wallet number and email);<br> | |||
– log out.<br> | |||
The globe icon leads to our [https://www.globula.space/ Globula site], the Telegram icon opens our [http://t.me/globula_community Telegram community forum] where you can ask any further questions about the game. | |||
Latest revision as of 11:09, 11 December 2025
The basic task is to explore the universe of Globula with the help of different tools: harvest TEUs, acquire components and blueprints to craft all the necessary equipment.
APK download
Temporal Energy Harvesting
[edit]At the start there are some TEUs (temporal energy units) already available for use, including several full batteries for basic weapons.
TEUs are required for all tools in Globula.
To get more TEUs you need to use the Harvester tool.
-
 Basic SO-RI & Upper Slot

Tap the empty upper slot to open the Tools/Weapons pop-up tab. Tap the desired tool to place it into the upper slot.
Basic TEU Harvester is already available at the start of the game. Harvesting TEUs is only possible when you move with the device at the speed up to 9 km/h.
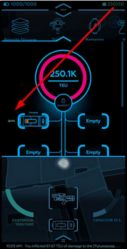
TEUs first fill the EXISTENSOR (the active bar on the left), and once it reaches its capacity, TEUs are transferred into the REMOTE STORAGE (in the top right corner). The arrows on the screenshot below show the existensor bar and the remote storage volume.
-
 Existensor & Remote Storage

The active bar on the right (OPTIMAL SPEED) shows your current speed in the real world.
Tap the lower empty slop to open the pop-up battery tab. There are several full batteries already available at the start. Tap any to place it into the lower slot.
-
 Batteries & Lower Slot

If there is a harvester and an empty battery equipped, TEUs first charge up the battery up to its full capacity, then fill up the existensor, and then pass on into the remote storage. TEU harvesting can be performed with or without a battery equipped.
Long tap the upper or lower slot to remove the tool equipped and empty the slot.
‘Pocket’ TEU harvesting
[edit]There is a sliding switch between the upper and the lower tool slot. Swipe right to activate the screen block. This would allow you to keep harvesting TEUs while the device is in your bag or pocket. The screen would dim and ignore any accidental taps. To deactivate the screen block, swipe the switch left.
-
 Pocket mode switch
 -
 Pocket mode


Hunting Globulas and Acquiring Components
[edit]TEUs are required to charge weapons for hunting globulas (cryptic inhabitants of Globula). There are several weapons already available at the start.
-
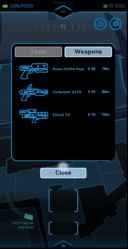 Tap the empty upper slot to open the pop-up tab Tools/Weapons.
 -
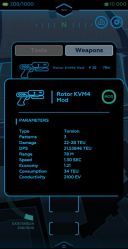 Long tap any tool or weapon in the menu to get additional information in a pop-up window.
 -
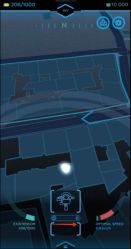
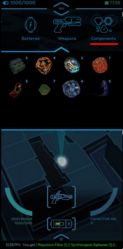
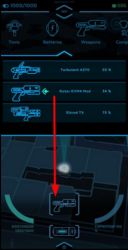 Weapons and tools can also be selected from the general inventory menu at the top of the map (tap the INV icon).


Any weapon requires a battery equipped in the lower slot (either tap the slot if it's empty or use the INV menu – Batteries). With both items equipped the CAPACITOR bar will appear on the right. The battery gradually charges the weapon as shown by the progress bar of the capacitor. Once it reaches 100% the weapon can be discharged at a targeted globula.
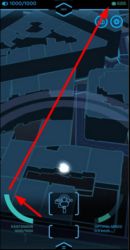
Globulas are different light objects on the map. They must be within the currently equipped weapon range (shown by the radar lines) to be hunted. Move the weapon’s light cone by swiping left or right and tap the globula within it. Tap the weapon to discharge it at the globula. The globula will stay targeted unless you move completely out of range or choose another object by tapping.
-
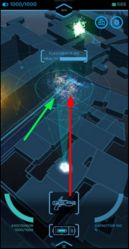 Globula in the Crosshairs

The capacitor refills automatically while the battery holds enough TEUs. Next weapon discharge is possible only at 100% capacitor charge. It might require equipping another charged battery if the previous one runs out of TEUs before the capacitor reaches its full charge.
The capacitor is a part of a weapon and holds the unused charge if removed into the inventory for later use.
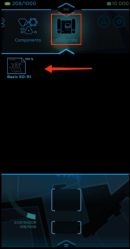
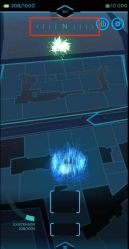
Damage and hitpoints of globulas are measured in TEUs. Globulas may drop different components for equipment crafting.
-
 Contents of the Components tab (INV menu)
 -
 System logs listing the components received from a globula.


Globulas are dangerous and will shoot back! When hit your EXISTENSOR will lose its charge proportional to the damage received. Once it's fully depleted, the app will restart automatically with some TEUs added to the EXISTENSOR.
-
 Way 1
Way 1 -
 Way 2
Way 2


There are two ways to recharge the EXISTENSOR.
1. Place the Harvester into the upper slot, remove any batteries from the lower slot, and walk a bit, so that TEUs gathered charge the EXISTENSOR directly.
2. Use the Resteupythor. This device allows to recharge the EXISTENSOR from a battery without having to move away from the attack point. Place the Resteupythor into the upper slot and a charged battery into the lower one. The battery will recharge the EXISTENSOR.
At the start of the game a 100% success rate Resteupythor blueprint is already placed in your inventory. You need to craft it from the components gathered from Globulas.
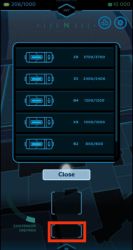
Remote Storage: Charging Batteries
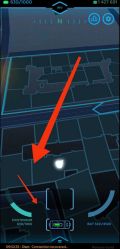
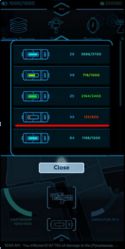
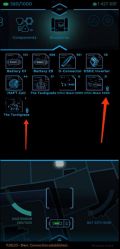
[edit]Empty batteries can be charged directly via a harvester (one by one) or via the Remote storage menu (several at once), provided the RS contains enough TEUs harvested previously.
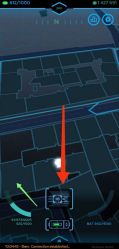
The screenshots below show the INV menu – Remote Storage (swipe left or right to see INV menu titles). First, the empty or partially discharged battery must be removed into the inventory (long tap the lower slot). Then tap any empty slot of the RS to open the battery window and tap the battery to place it into the chosen slot.
-
 Then tap any empty slot of the RS to open the battery window.
 -
 Tap the battery to place it into the chosen slot.
 -
 The battery starts charging the moment it’s placed into the RS slot, provided the app is open.


The RS does not charge batteries if the app is closed or in the background mode.
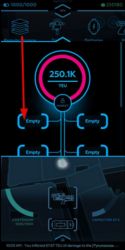
Crafting
[edit]Components received from globulas are used in crafting the equipment.
-
 Tap the INV menu – Blueprints to see blueprints in stock.
 -
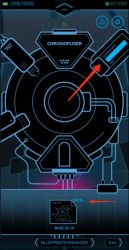 Tap any blueprint to open the CHRONUFUSER window.


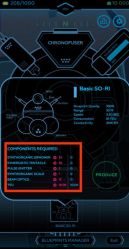
At the top right corner of both the Chronofuser and any blueprint there’s Success rate index (shows the chance of successful crafting from 1 to 100%). The lower panel shows all available blueprints in stock.
-
 Tap any to open the pop-up window with its description and the list of the required components.

Red/green numbers on the left show the necessary items while the blue ones on right show the items in stock, including the TEUs.
The PRODUCE button becomes tappable when all the resource requirements are met (in green).
Crafting uses up the blueprint and the resources (those items are removed from the inventory). The log shows the result (either an item is successfully produced, or the process fails).
Warning! Blueprints are consumable items. Both the blueprint and the set of the required components together with TEUs are removed from the inventory whatever the result of the crafting. It is highly recommended to use only high success rate blueprints for crafting to avoid loss of components.
Scanning Globulas and Acquiring Blueprints
[edit]Blueprints are obtained with the help of a special tool (requires crafting). At the start of the game a 100% success rate Basic SO-RI blueprint is already placed in your inventory.
Once it’s been crafted in the Chronofuser it becomes available as one of the tools.
The SO-RI is placed into the upper slot, it also requires a charged battery in the lower slot.
The radius of the SO-RI is a lot shorter than that of any weapon. Tap the globula once it’s in the scanning light cone, then tap the SO-RI to perform the scanning.
There are three possible outcomes of the scanning:
– it may produce one blueprint layer (the sys log would give the name of the exact blueprint);
– it may fail and generate no layers of blueprints;
– it might become unavailable if the number of scanning attempts exceeds a certain number.
The Basic SO-RI has a very low scan success chance. Besides, each globula can be scanned no more than three times. After the third attempt, the tool would signal that scanning is not available any more for that globula, and another target should be chosen for scanning.
Each successful scanning produces just one layer of a blueprint. The number of layers already collected is shown at the top right corner of a blueprint and corresponds to the success rate for crafting. Each successful scan adds one layer to a blueprint up to 100. The 101st successful scan of a blueprint will add another copy to the inventory, thus creating a 100% blueprint and a 1% blueprint.
Compass
[edit]There is a compass scale at the top of the map.
-
 It shows the four cardinal directions (E, N, W, S), and will always point north at the launch of the app.

You can change the view direction by sliding your finger over the map. To define your actual position use map objects such as buildings and roads to correlate with the real world objects around. The compass does not show your actual movement direction.
The map does not autorotate on the move! It will only rotate around a targeted globula while it’s within a weapon/tool’s range to keep it visible if the hunter is moving.
Chats and logs
[edit]
Tap or swipe up the ‘=’ element at the bottom of the screen to pull open the chats and logs window. Swipe the ‘=’ element up or down to change the window size. To close the chat, tap anywhere on the screen outside the window.
The chats and logs window has three tabs: ALL, SOC and SYS.
The SYS (system) tab contains game logs: TEUs used for weapon discharge, damage dealt and received, items dropped, and so on.
-
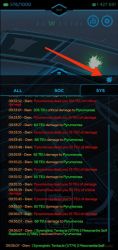 All damage logs can be switched off by tapping the quasar-icon in the right corner of the chat window.

The SOC (social) tab is for in-game communication.
-
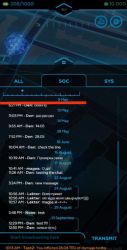 There is a chat distance filter in the upper part of the tab: 5, 20, 100 and 1000 km radius from your current position.

The chat shows the latest 25 messages. To load the previous messages, pull the chat down. Each swipe down will load another 25 messages. You can scroll the messages by swiping the chat up-down or with a slider on the right.
All transmitted messages are available in the maximum 1000 km radius whatever the chosen distance of the message filter in the chat options!
The ALL tab contains all messages, including system logs and social interaction.
Minting and Transferring Items
[edit]Almost any item in the game can be minted into an NFT and put into your TON wallet to be sold or handed over. And any NFT from GLOBULA blockchain can be transferred back into the game.
Practically any component, resource, weapon, blueprint, tool or battery can be NFT'd or turned back into playable objects, apart from the first items given at the registration as a basic starter kit.
In order to be able to create and transfer NFTs you must have a TON wallet bound and connected to your account.
Open the required inventory tab and long tap an object you want to NFT.
-
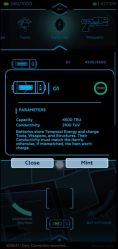 You will see the following pop-up.

Tap Mint to open your TON wallet and confirm the minting (costs 0.02 TON). If you are using the login-password method for the app, you would also need to connect a TON wallet to perform any of the minting operations. Make sure you connect the same TON wallet that has been bound to your account.
The transaction may take up to 5 minutes. Once it's finished, you will see your NFT'd item back in its designated inventory tab but with a special chain icon on the right. The NFT itself will be placed into your TON wallet collection.
-
 the blueprints inventory tab, some items are playable (the number index on the right), some are marked as NFT'd items (the chain icon) in a TON wallet.

You can create a unified (bulk) NFT containing several identical items at once! For example, you own 1000 components or blueprints of the same item. You can choose any quality of identical items when creating an NFT. Thus, a single NFT can be turned back into multiple playable items.
NFTs can't be used directly in the game. These objects are for trading and handing over only, but can be turned back into playable items if required.
-
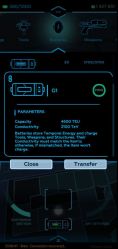 To transfer an NFT back into the game as a playable item long tap its icon (with a chain symbol on the right). You will see the following pop up.

Tap Transfer to open your TON wallet and confirm the operation (costs 0.02 TON). Please wait for the transaction to be fully finished in the blockchain. The NFT will be removed from your TON wallet and placed into your game inventory as a regular playable item (no chain symbol on the right) for further use.
User Settings
[edit]Tap the Gear icon in the top right corner to open the user settings pop-up menu.


It contains:
– background music volume;
– sound effects volume;
– vibration intensity;
– 3D buildings effect on/off;
– connections menu (your TON wallet number and email);
– log out.
The globe icon leads to our Globula site, the Telegram icon opens our Telegram community forum where you can ask any further questions about the game.